
This is a short step-by-step guide/tutorial on how to connect a PX4 flight controller to a companion computer. This guide is based on connecting the PX4 flight controller from NXP, the RDDRONE-FMUK66, and the new SBC from NXP, the NavQPlus. It applies to other hardware as well but some instructions/commands and file locations may be different.
In general there are two ways (protocols) to connect a PX4 flight controller to a companion computer: using MAVLink or through a ROS bridge. For the ROS case, the middle ware used depends on the PX4 version. For versions V1.11 to V1.13 the eProsima Micro XRCE-DDS communication middleware is used, while the new V1.14 (in beta at the time of writing) uses micro ROS (uROS) with the eProsima FastDDS communication middleware.
Both ways, MAVLink or ROS/DDS, can be used over a serial interface (UART) or a ethernet interface. The ethernet link is preferred over serial, if it is available, as it is more robust and has a higher link budget (datarate). Both the FMUK66 and NavQPlus have a two wire automotive ethernet (100BASE-T1) interface therefore this is the preferred physical interface to be used.
Setting up ethernet
This guide is based on documentation for the NavQPlus: Running MavLink over T1 Ethernet
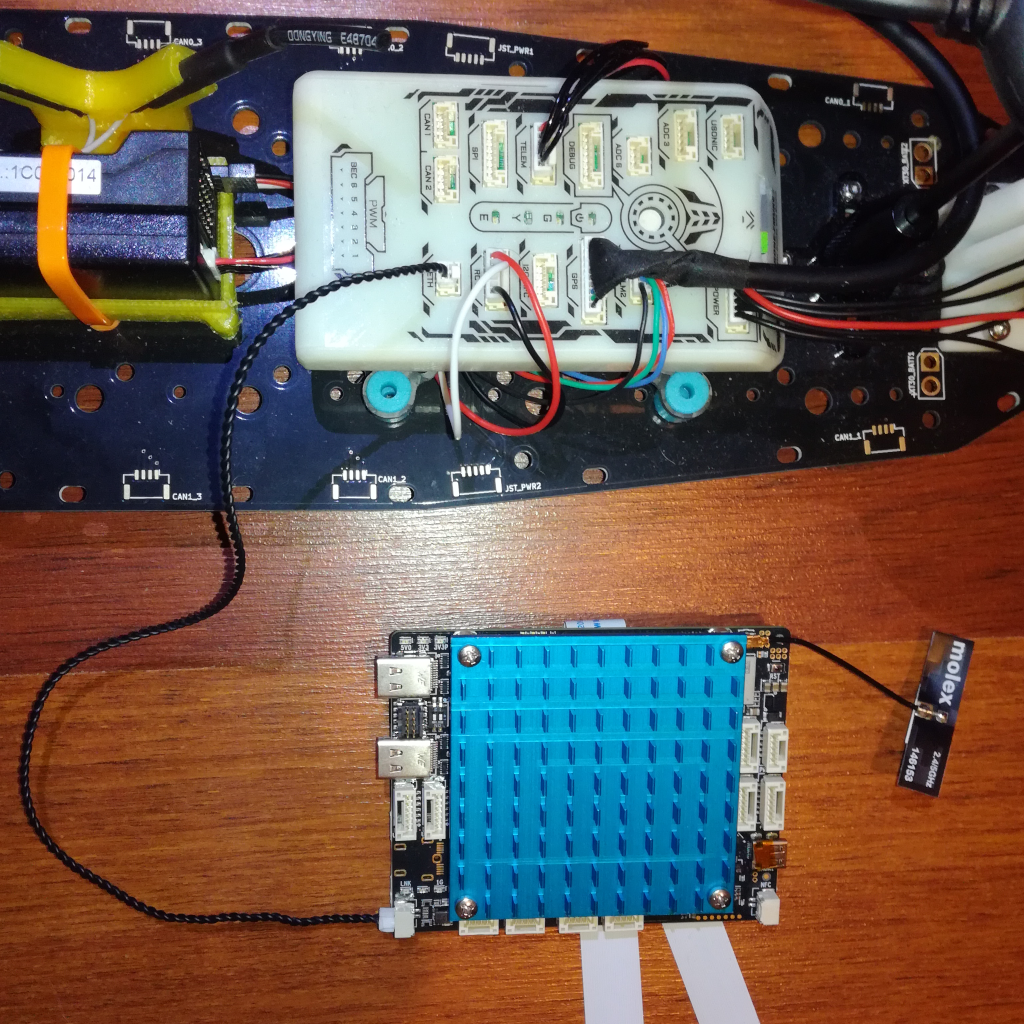
First connect the FMUK66 to the NavQPlus with a two wire twisted pair as shown in the figure below:
After that, the NavQPlus automotrive ethernet interface, under linux this is listed as eth0, must be configured to use a static IP address. The FMUK66, with the latest PX4 firmware, already has the ethernet interface configured to use a static IP address of 10.0.0.2. To set a static IP on the NavQPlus running the latest Ubuntu 22.04 linux build, we use netplan, the default connection manager for Ubuntu 22.04. The configuration file for netplan is the following, for the NavQPlus Ubuntu image, for other hardware and linux images the location and file name can change:
/etc/netplan/01-network-manager-all.yamlIt can happen that file permissions must be changed, to allow editing of this file, which can be done with chmod e.g. with the following command which will enable all permissions to all users:
sudo chmod 777 01-network-manager-all.yaml After that, the file can be edited with nano, or any other text editor, using following command:
sudo nano /etc/netplan/01-network-manager-all.yamlThe files content should be changed to the below. Attention to indentation, as YAML is very sensitive to it and it may through errors if incorrect indentation is used!
network:
  version: 2
  renderer: NetworkManager
  ethernets:
    eth0:
      dhcp4: false
      dhcp6: false
      addresses:
        - 10.0.0.3/24
      routes:
        - to: default
          via: 10.0.0.3
The above configuration will set the NavQPlus T1 ethernet (eth0), to not use DHCP and use a fixed IP of 10.0.0.3 instead. It also sets the router as 10.0.0.3 since no router will be used in this case, with a direct connection between the FMUK66 and NavQPlus. Some more information on netplan configurations can be found here
After that the changes can be applied with the following command:
sudo netplan applyWith that, the FMUK66 should be connected to the NavQPlus via the automotive ethernet. Test the connection with a simple ping command:
ping 10.0.0.2Run MAVLink over ethernet
With the ethernet connection established, we can now run MAVLink over this interface. The easiest way to achieve this is to add a file to the FMUK66 micro SD card in the following location:
/etc/extras.txtThis is the location searched by the PX4 firmware for additional start up scripts. More information on system startup and startup scripts can be found here. To start a MAVLink interface over ethernet the following command is added to this file:
set +e
mavlink start -x -u 14551 -o 14551 -r 200000 -t 10.0.0.3 -m onboard
set -e
This will start a MAVLink interface to the NavQPlus, which we set to have an IP of 10.0.0.3, on port 14551 using the UDP protocol and using the onboard MAVLink messages definitions. To use the default MAVLink message definition just omit the last part, “-m onboard”. More info on MAVLink and MAVLink message definitions, can be found here, and a more detailed description of the MAVLink start parameters can be found here.
With this MAVLink messages can now be received and sent from the NavQPlus. As an example, using python and pymavlink, use the following command/code to start listening to MAVLink messages on UDP port 14551 (as set in the MAVLink start script above):
master = mavutil.mavlink_connection("udpin:10.0.0.3:14551")